| borderColor | #ccc |
|---|---|
| bgColor | #f4f5f7 |
| borderStyle | solid |
Objective: Learn how to utilize the client log, tag cases, add and edit log records.
Accessing the Client Log
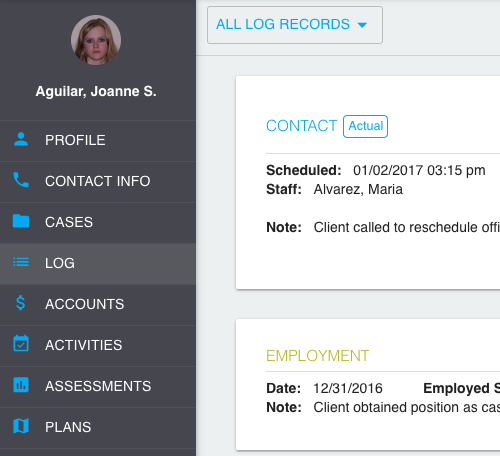
The Client Log encompasses several types of vital case information that are displayed together as a feed of client activity, so you can stay on top of it all. These log items
includeinclude Contacts, Drug Tests, Staff Notes, Arrests, Custody, Conduct, Referrals,
EmploymentEmployment, and
CourtCourt Events (formerly
LegalLegal Actions).
You can access the Client Log by opening the client screen for a specific client, then
clicking Logclicking Log on the side menu.
Filtering Log Records
WhenWhen the Log section first appears, All
loglog records are visible, with the most recent record displayed at the top of the feed. This allows the user to see a broad overview of the most recent client activity.
At the top of the screen, you will notice a drop down menu (it will display “All Log Records” by default).
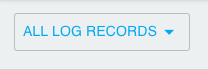
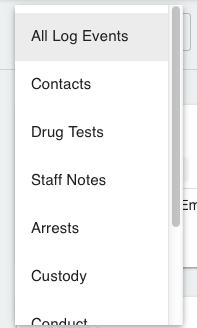
To filter the list to display only a certain type of record, select that record type from the drop down menu. Once a record type has been selected, only those records will be displayed.
 Each
Each Each type of record is displayed in a similar fashion, with the most recent record at the top of the feed.
Adding a New Log Record
Log records can be
added one of two ways.
The first way is from the
default "All Log Records"
view of the list.
When you click
the Add New
button at the bottom right corner of the screen, a menu will open for you to select which type of record you wish to add.

The second way is to first filter the log list to display the type of log record you wish to add (ex. Contacts).
Once the log list is filtered, simply click
the Add New
button.

| Anchor | ||||
|---|---|---|---|---|
|
Tagging Cases
In previous versions of Probatum, many of these items could be found within a single case. Because some of these items are true across all of the client’s cases, they are now recorded in the top level client record. For instance, if a client’s employment status changed from part-time to full-time, his employment status would change across the board, not just in one of his active cases. However, to maintain the ability to connect these records to specific cases, you can now tag cases when you create the log record.
What is the purpose of tagging cases?
Let’s say you had a contact with your client. You would record the contact in the client log. While any type of contact is still a contact with the client regardless of what it was regarding, you may have only discussed items that pertain to case 16CR1234. In this situation, you might want to tag that specific case when you create the contact record. Now, when you look at all the client’s contact records, you can search for case number 16CR1234 and filter the contact list to see only the contacts related to that case.
To tag a case, follow the steps outlined below:
When adding/editing a log record (of any type), you will find a field labeled Tagged Cases at the bottom of the form.
Begin typing the Case ID into the field. A list of matching Case IDs will appear in a select list.
Click the Case ID you wish to tag.
As you can see in the image below, tagged cases will display with an "x" beside them. You can remove the tagged case by simply clicking the "x".
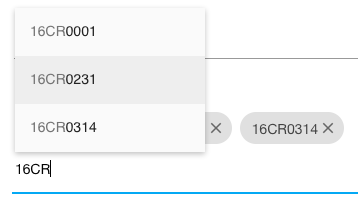
After saving the record, the log record will now display with the tagged cases.

Contacts
To view contacts, navigate to the Client Log, then click the menu labeled
AllAll Log Records
and and select Contacts from the menu.
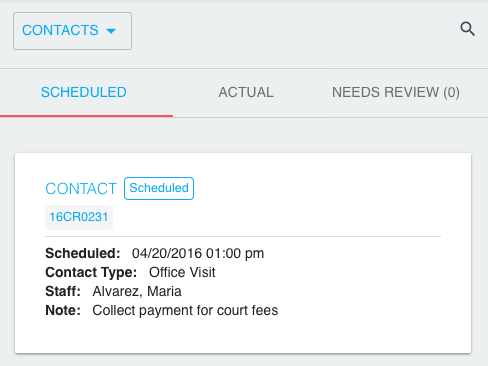
From here, you'll notice that Contacts in the are divided into 3 categories: Scheduled, Actual,
and Needs Review. Each will be covered more in depth in the following tutorials.
Scheduled Contacts
When a contact is created with a date/time more than 15 minutes into the future, it will be interpreted as a scheduled contact and included in the "Scheduled" Contact list.
Adding a New Scheduled Contact
Click
the Add New
button in the bottom right corner of the screen.
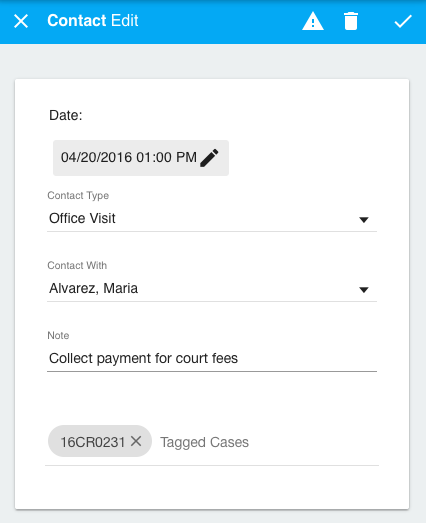
When the contact form opens, you will notice that the date defaults to the current date and time. Click
the edit icon
beside the date to edit.
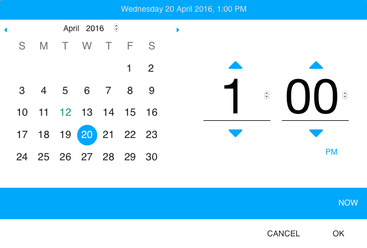
Use the calendar to select
the date
you wish to schedule the contact.
Use the up and down arrows to select
the time
you wish to schedule the contact or enter it manually into the time field. Click the button below the time to toggle between AM and PM.
When you have selected the correct date and time,
Click OK.

Select
the Contact
Type (ex. Telephone, Office Visit, etc.).
Select the officer or individual who the client will be meeting with in
the Contact With
field.
Enter any other comments or notes in
the Note
field if you wish.
If you wish to tag a case, begin typing the Case ID in the Tagged Cases
field. Click the corresponding case number when it appears. You can tag multiple cases.
Click the checkmark icon in the top toolbar
to save
the contact.

Marking a Scheduled Contact as Completed
From
the Scheduled
contact list, click the contact you wish to mark as completed. Let's look at the contact we just scheduled in the previous exercise.
When the detail view opens, click
the edit icon
in the blue toolbar to open the edit form.

You'll notice that
the Scheduled Date
displays, but
the Contact Made
field has not yet been updated.
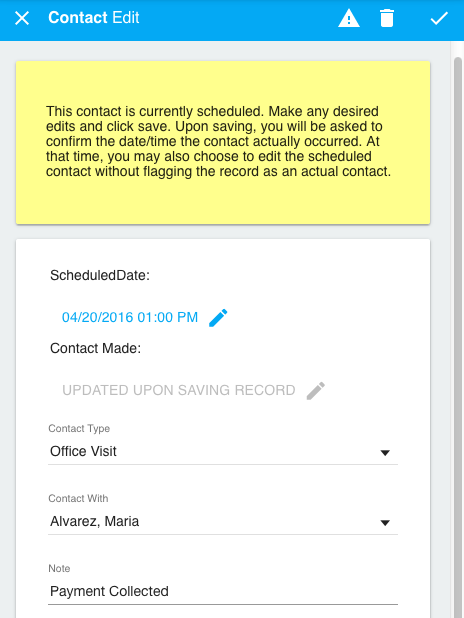
If you want to add or update your comments to reflect the meeting with your client, enter them in
the Note
field. In this example, the note was updated from "Collect payment for Court Fees" to "Payment collected".
Once you have completed any edits you wished to make, click the checkmark icon in the top toolbar
to save
the contact.
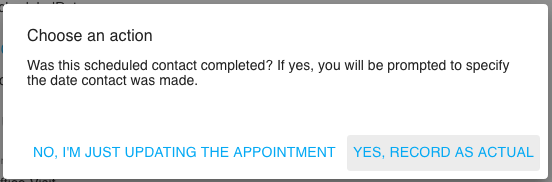
You will receive a prompt asking you whether you want to mark the contact as
an Actual
contact, or simply edit the scheduled contact without completing it.
Click Yes, Record as Actual.
You will then be prompted to select
the date
the contact was made. The actual date/time the contact was made will not necessarily be the same as the scheduled date/time.
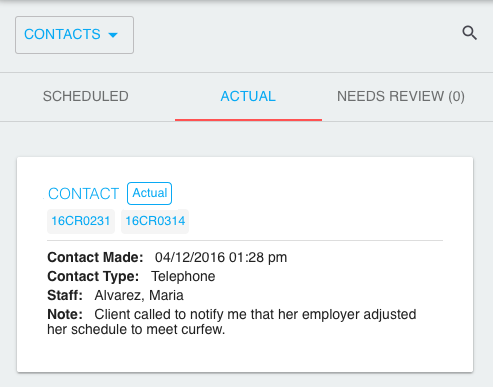
The contact will now be removed from
the Scheduled
contact list and appear as an
Actual contact.
| Info |
|---|
A complete list of scheduled contacts that are either due to be completed soon, or are past due to be completed for all active clients can be found in |
the "Pending" and "Overdue" Contacts section on the home screen. |
Actual Contacts
The previous tutorial outlined how to mark
aa Scheduled
contactcontact as completed, making it
anan Actual
contactcontact. That is just one scenario that would result in a contact being recorded as
anan Actual
contactcontact. Now, suppose that a client calls your office and he or she had no prior scheduled appointment to meet or talk with you. In this case, you would simply add the contact in Probatum as
anan Actual
contactcontact.
When creating a new contact, leaving the timestamp as-is, or adjusting to a date/time in the past, will be interpreted as a contact that actually occurred.
Adding a New Actual Contact
Click
the Add New
button in the bottom right corner of the screen.
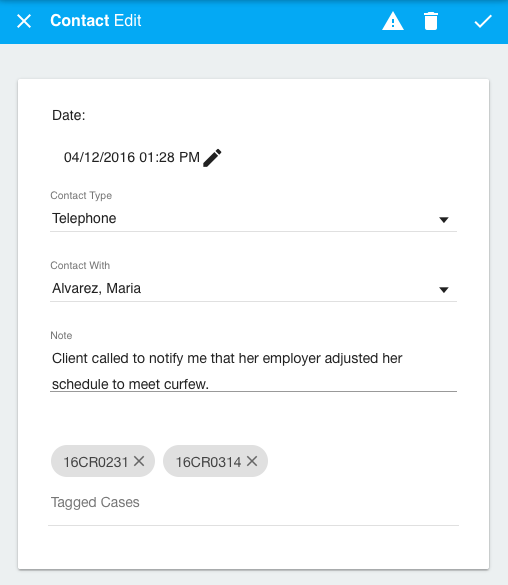
When the contact form opens, you will notice that the date defaults to the current date and time. If the contact actually occurred at
a previous
date/time, click
the edit icon
beside the date to edit. (Note: Adding a future date/time will classify this contact as
a Scheduled
contact).
Use the calendar to select
the date
that the contact occurred.
Use the up and down arrows to select
the time
the contact occurred or enter it manually into the time field. Click the button below the time to toggle between AM and PM.
When you have selected the correct date and time,
Click OK.
Select
the Contact
Type (ex. Telephone, Office Visit, etc.).
Select the officer or individual who the client spoke to or met with in
the Contact With
field.
Enter any other comments or notes in
the Note
field if you wish.
If you wish
to tag a case, begin typing the Case ID in
the Tagged Cases
field. Click the corresponding case number when it appears. You can tag multiple cases.
Click the checkmark icon in the top toolbar
to save
the contact.
Third-Party Contacts (Reviewed/Needs Review)
When clients
are shared with a third-party partner organization/service provider,
anyany client contacts that they record in Probatum are
consideredconsidered Third-Party
contactscontacts and will need to be reviewed by the case manager. These contacts will initially display in
thethe Needs Review
contact contact section.
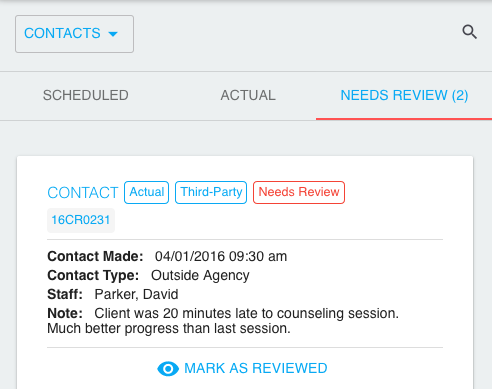
Reviewing a Third-Party Contact
Reviewing a third-party contact can be done one of 2 ways:
From the contact record in
the Needs Review
list, simply
click Mark as Reviewed.
OR
Click on the contact record in
the Needs Review
list.
When the detail view opens, click
the edit icon
in the blue toolbar to open the edit form.
Click the checkbox at the bottom of the form
labeled Mark as Reviewed?.

Click the checkmark icon in the top toolbar
to save
the contact.
The contact will now appear in the list
of Actual
contacts tagged as an Actual, Third-Party, Reviewed contact.

| Info |
|---|
A complete list of contacts needing review for all active clients can be found in the "Needs Review" Contacts section on the home screen. |
Drug Tests
Adding a New Drug Test
Click
the "Add New"
button in the bottom right corner of the screen.
Select
the Test Date. Today’s date will appear automatically, but if you wish to change the date, click the calendar icon and choose the correct date.
Select the staff who performed the
test from the drop down menu in
the Administered By
field.
Select
the Drug Tested
from the drop down menu.
Select
the Test Result
from the drop down menu.
If you wish
to tag a case, begin typing the Case ID in
the Tagged Cases
field. Click the corresponding case number when it appears. You can tag multiple cases.
If you are satisfied with your entry, click the checkmark icon in the toolbar to save the record. If you wish to close the edit view without saving, click the x in the toolbar to cancel your changes and return to the previous screen.
Editing a Drug Test
Locate the Drug Test record you wish to update. Click the record in the list to open the detail view.
Click the edit icon in the toolbar to open the edit view.
Select
the Test Date
by clicking the calendar icon and choosing the correct date.
Select the staff who performed the
test from the drop down menu in
the Administered By
field.
Select
the Drug Tested
from the drop down menu.
Select
the Test Result
from the drop down menu.
If you want to make any additional notes or comments, enter them in
the Note
field.
If you wish
to tag a case, begin typing the Case ID in
the Tagged Cases
field. Click the corresponding case number when it appears. You can tag multiple cases.
If you are satisfied with your changes, click the checkmark icon in the toolbar to save the record. If you wish to close the edit view without saving, click the x in the toolbar to cancel your changes and return to the previous screen.
Staff Notes
Adding a Staff Note
Click
the "Add New"
button in the bottom right corner of the screen.
Enter any notes or comments in
the Note
field.
If you wish
to tag a case, begin typing the Case ID in
the Tagged Cases
field. Click the corresponding case number when it appears. You can tag multiple cases.
The staff
person who recorded the note, as well as
the date
it was recorded will be saved automatically.
If you are satisfied with your entry, click the checkmark icon in the toolbar to save the record. If you wish to close the edit view without saving, click the x in the toolbar to cancel your changes and return to the previous screen.
Editing a Staff Note
Click anywhere inside the note record you wish to update to open the detail view.
Click the edit icon in the toolbar to open the edit view.
Enter any notes or comments in
the Note
field.
If you wish
to tag a case, begin typing the Case ID in
the Tagged Cases
field. Click the corresponding case number when it appears. You can tag multiple cases.
If you are satisfied with your changes, click the checkmark icon in the toolbar to save the record. If you wish to close the edit view without saving, click the x in the toolbar to cancel your changes and return to the previous screen.
Arrests
Adding a New Arrest
Click
the "Add New"
button in the bottom right corner of the screen.
Select
the Date of Arrest. Today’s date will appear automatically, but if you wish to change the date, click the calendar icon and choose the correct date.
Select
the Offense and Degree from the corresponding drop down menus.
If you want to make any additional notes or comments, enter them in
the Note
field.
If you wish
to tag a case, begin typing the Case ID in
the Tagged Cases
field. Click the corresponding case number when it appears. You can tag multiple cases.
If you are satisfied with your entry, click the checkmark icon in the toolbar to save the record. If you wish to close the edit view without saving, click the x in the toolbar to cancel your changes and return to the previous screen.
Editing an Arrest
Click anywhere inside the arrest record you wish to update to open the detail view.
Click the edit icon in the toolbar to open the edit view.
Select
the Date of Arrest
click the calendar icon and choose the correct date.
Select
the Offense and Degree from the corresponding drop down menus.
If you want to make any additional notes or comments, enter them in
the Note
field.
If you wish
to tag a case, begin typing the Case ID in
the Tagged Cases
field. Click the corresponding case number when it appears. You can tag multiple cases.
If you are satisfied with your changes, click the checkmark icon in the toolbar to save the record. If you wish to close the edit view without saving, click the x in the toolbar to cancel your changes and return to the previous screen.
Custody
Adding a New Custody
Click
the "Add New"
button in the bottom right corner of the screen.
Select the dates the client was taking into custody and released (if applicable) in
the In Date
and Out Date
fields by clicking the calendar icon and choosing the correct date for each item.
Select
the Facility
from the drop down menu.
If you want to make any additional notes or comments, enter them in
the Note
field.
If you wish
to tag a case, begin typing the Case ID in
the Tagged Cases
field. Click the corresponding case number when it appears. You can tag multiple cases.
If you are satisfied with your entry, click the checkmark icon in the toolbar to save the record. If you wish to close the edit view without saving, click the x in the toolbar to cancel your changes and return to the previous screen.
Editing a Custody
Click anywhere inside the custody record you wish to update to open the detail view.
Click the edit icon in the toolbar to open the edit view.
Select the dates the client was taking into custody and released (if applicable) in
the In Date
and Out Date
fields by clicking the calendar icon and choosing the correct date for each item.
Select
the Facility
from the drop down menu.
If you want to make any additional notes or comments, enter them in
the Note
field.
If you wish
to tag a case, begin typing the Case ID in
the Tagged Cases
field. Click the corresponding case number when it appears. You can tag multiple cases.
If you are satisfied with your changes, click the checkmark icon in the toolbar to save the record. If you wish to close the edit view without saving, click the x in the toolbar to cancel your changes and return to the previous screen.
Conduct
Adding a New Conduct
Click
the "Add New"
button in the bottom right corner of the screen.
Select
the Date. Today’s date will appear automatically, but if you wish to change the date, click the calendar icon and choose the correct date.
Select
the Conduct Observation
and Conduct Response
from the corresponding drop down menus.
If you want to make any additional notes or comments, enter them in
the Note
field.
If you wish
to tag a case, begin typing the Case ID in
the Tagged Cases
field. Click the corresponding case number when it appears. You can tag multiple cases.
If you are satisfied with your entry, click the checkmark icon in the toolbar to save the record. If you wish to close the edit view without saving, click the x in the toolbar to cancel your changes and return to the previous screen.
Editing a Conduct
Click anywhere inside the conduct record you wish to update to open the detail view.
Click the edit icon in the toolbar to open the edit view.
Select
the Date
by clicking the calendar icon and choosing the correct date.
Select
the Conduct Observation
and Conduct Response
from the corresponding drop down menus.
If you want to make any additional notes or comments, enter them in
the Note
field.
If you wish
to tag a case, begin typing the Case ID in
the Tagged Cases
field. Click the corresponding case number when it appears. You can tag multiple cases.
If you are satisfied with your changes, click the checkmark icon in the toolbar to save the record. If you wish to close the edit view without saving, click the x in the toolbar to cancel your changes and return to the previous screen.
Referrals
Adding a New Referral
Click
the "Add New"
button in the bottom right corner of the screen.
Select
the Referral Date.
Today’s date will appear automatically, but if you wish to change the date, click the calendar icon and choose the correct date.
Select
the Referral Type
from the drop down menu.
Select the Staff who made the referral in
the Referred By
drop down menu.
If you want to make any additional notes or comments, enter them in
the Note
field.
If you wish
to tag a case, begin typing the Case ID in
the Tagged Cases
field. Click the corresponding case number when it appears. You can tag multiple cases.
If you are satisfied with your entry, click the checkmark icon in the toolbar to save the record. If you wish to close the edit view without saving, click the x in the toolbar to cancel your changes and return to the previous screen.
Editing a Referral
Click anywhere inside the referral record you wish to update to open the detail view.
Click the edit icon in the toolbar to open the edit view.
Select
the Referral Date
by clicking the calendar icon and choosing the correct date.
Select
the Referral Type
from the drop down menu.
Select the Staff who made the referral in
the Referred By
drop down menu.
If you want to make any additional notes or comments, enter them in
the Note
field.
If you wish
to tag a case, begin typing the Case ID in
the Tagged Cases
field. Click the corresponding case number when it appears. You can tag multiple cases.
If you are satisfied with your changes, click the checkmark icon in the toolbar to save the record. If you wish to close the edit view without saving, click the x in the toolbar to cancel your changes and return to the previous screen.
Employment
Adding a New Employment Status
Click
the "Add New"
button in the bottom right corner of the screen.
Select the date in
the As Of
field. Today’s date will appear automatically, but if you wish to change the date, click the calendar icon and choose the correct date.
Select
the Employment Status
from the drop down menu.
If you want to make any additional notes or comments, enter them in
the Note
field.
If you wish
to tag a case, begin typing the Case ID in
the Tagged Cases
field. Click the corresponding case number when it appears. You can tag multiple cases.
If you are satisfied with your entry, click the checkmark icon in the toolbar to save the record. If you wish to close the edit view without saving, click the x in the toolbar to cancel your changes and return to the previous screen.
Editing an Employment Status
Click anywhere inside the employment record you wish to update to open the detail view.
Click the edit icon in the toolbar to open the edit view.
Select the date in
the As Of
field by clicking the calendar icon and choosing the correct date.
Select
the Employment Status
from the drop down menu.
If you want to make any additional notes or comments, enter them in
the Note
field.
If you wish
to tag a case, begin typing the Case ID in
the Tagged Cases
field. Click the corresponding case number when it appears. You can tag multiple cases.
If you are satisfied with your changes, click the checkmark icon in the toolbar to save the record. If you wish to close the edit view without saving, click the x in the toolbar to cancel your changes and return to the previous screen.
Court Events (Legal Actions)
Adding a New Court Event (Legal Action)
Click the"Add New"button in the bottom right corner of the screen.
Select the date in the Date field. Today’s date will appear automatically, but if you wish to change the date, click the calendar icon and choose the correct date.
Select the Event from the drop down menu.If an event signifies a violation, a violation tag will appear beside the event name.

If you want to make any additional notes or comments, enter them in the Note field.
If you wish to tag a case, begin typing the Case ID in the Tagged Cases field. Click the corresponding case number when it appears. You can tag multiple cases.
If you are satisfied with your entry, click the checkmark icon in the toolbar to save the record.
If you wish to close the edit view without saving, click the x in the toolbar to cancel your changes and return to the previous screen.
| Info |
|---|
You can define which events signify violations in the Organization Management portion of Probatum. |
Editing a Court Event (Legal Action)
Click anywhere inside the court event record you wish to update to open the detail view.
Click the edit icon in the toolbar to open the edit view.
Select the date in the Date field by clicking the calendar icon and choosing the correct date.
Select the Event from the drop down menu.
If you want to make any additional notes or comments, enter them in the Note field.
If you wish to tag a case, begin typing the Case ID in the Tagged Cases field. Click the corresponding case number when it appears. You can tag multiple cases.
If you are satisfied with your changes, click the checkmark icon in the toolbar to save the record.
If you wish to close the edit view without saving, click the x in the toolbar to cancel your changes and return to the previous screen.
| Info |
|---|
Options for items such as Contact Types, Drug Types, Drug Test Results, Observed Behaviors, Conduct Responses, Employment Types Referral Types, Offenses, and Incarceration Facilities can be added or edited in the Organization Management portion of Probatum. |
| borderColor | #ccc |
|---|---|
| borderWidth | 1 |
| borderStyle | solid |
On this page:
| Table of Contents |
|---|